Whoa, it's the last day of January, how'd that happen so soon?
I did a lot of sewing yesterday, and even some this morning before catching church. Nick was doing his usual 'drag the heels' since it's Sunday, and it's a blustery day with strong winds and heavy rain...does wonders for the freeways-hah!...so we opted to stay in the comforts of our home and catch the services online.
I'll post about the project worked on tomorrow, but for today, I tallied up the scraps which have never before been added to my stash, and they equal about 9/10s of a yard.
Used This Week: 0 yards
Added This Week: .9 yards
Used 2016: 0 yards
Added 2016: .9 yards
Linking at Patchwork Times.
Sunday, January 31, 2016
Thursday, January 21, 2016
Spoolin'
These past few days have been spent reviewing my Spools project. It too was started as a Leader/Ender project. I've calculated that it has 297 individual fabrics in it. All scraps.
The block is made up of side sets which form the background of the spools made from the spool sets. After counting up how many I had of these side sets and the spool sets, I made a decision as to how big I wanted to make this quilt. I chose a lap-size, and with 3" borders, it will measure 57" x 69". I was 58 side sets short, 4 spool sets over (I may use them as border corner stones).
It was pretty easy to find more fabrics in my 1.5" strip bin to bring the count up. They are now all counted out and bundled so that when I do actually sew on them again, I'll know where I am, and I updated my 'plan' sheet so I won't forget my plan.
75 blocks were already completed, and I need 357 blocks total. They will finish at 3" square.
I'll figure out the layout after I finish all the blocks. I tried to find some ideas on the internet but most were using much larger blocks. I can revisit that later. I know there are bloggers who've done some, so I may poke around there, or just leave it all to my own imagination.
The block is made up of side sets which form the background of the spools made from the spool sets. After counting up how many I had of these side sets and the spool sets, I made a decision as to how big I wanted to make this quilt. I chose a lap-size, and with 3" borders, it will measure 57" x 69". I was 58 side sets short, 4 spool sets over (I may use them as border corner stones).
It was pretty easy to find more fabrics in my 1.5" strip bin to bring the count up. They are now all counted out and bundled so that when I do actually sew on them again, I'll know where I am, and I updated my 'plan' sheet so I won't forget my plan.
 |
| Neatly bundled and labeled side sets on left, and spool sets on right. |
 |
| Current finished blocks in no specific order or layout. |
Monday, January 18, 2016
Design Wall Monday, 18 January 2016
Last week was all about my "Black Tie Party" of scrappy bow ties on a solid black background. I've progressed no further than getting a feel for where I am with that project and making sure I have the unit sets needed. I was missing a piece or two, and couldn't find a match in my scraps or precuts so those pieces became scraps themselves with other fabrics replacing them. I've put the bow ties away again for now.
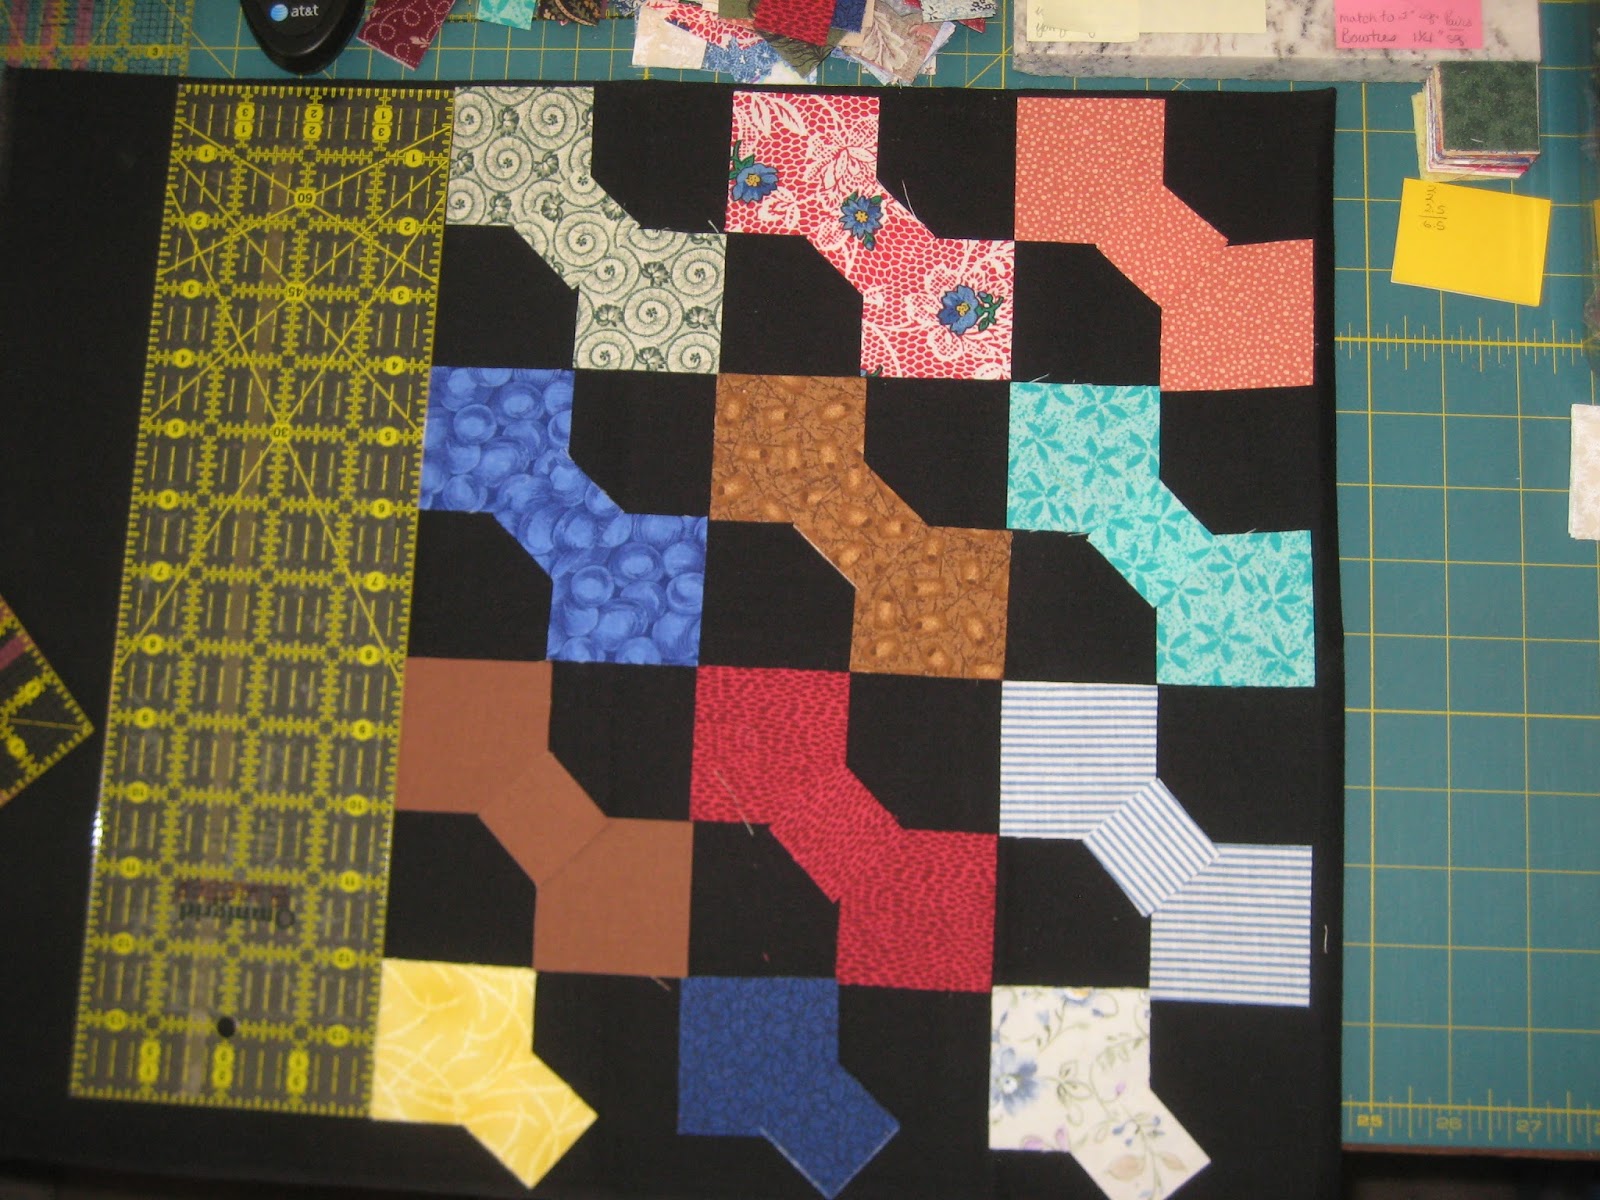
After reviewing Scrap O' Nine Tails and having worked on the strip sets as of last week's post, I also recalculated how big I wanted the quilt and proceeded to prep the fabric for, and cut, the alternating plain blocks. I calculated that I needed 336 plain blocks, and 336 pieced 9-Patch blocks.
The finished size of each 9-P and of each plain square will be 2 1/4". Using neutrals as the background (alternating squares) and also in so many of the 9-Ps, it seems a bit blah, but warm in overall tone. Some of the fabrics are pretty bright (note the blue & red in the upper right corner) yet so many of these fabrics are from the '80s and '90s with their Americana hues and patterns, as with the red and tan stripe near the center and the small red and tan plaid in the lower left corner. This is truly a scrap-tastic project and has at least 190 or more different fabrics in it.
This has now been packed away as well with a much clearer record and plan put on paper.
I'll be pulling out and reviewing my Spools project next. It was also begun as a Leader/Ender project.
Another thing I did last night, so I would know where I stand in my projects, was to review my Excel spreadsheet as to what stage my projects are in, and how many are in certain stages. I discovered:
Don't forget to head over to Patchwork Times to see what else is happening among our quilt/blog friends.
 |
| Bow Tie sets |
 |
| 336, 2 3/4" neutral squares |
 |
| Sampling of 9-Ps and alternating squares. |
This has now been packed away as well with a much clearer record and plan put on paper.
I'll be pulling out and reviewing my Spools project next. It was also begun as a Leader/Ender project.
Another thing I did last night, so I would know where I stand in my projects, was to review my Excel spreadsheet as to what stage my projects are in, and how many are in certain stages. I discovered:
- 4 are pinned and ready to quilt
- 17 are flimsies and could be pinned
- 5 need borders to become flimsies
- 1 has completed blocks ready to be sewn into rows
- 5 have all pieces cut and some sewing has been done on them
- 3 have all pieces cut but nothing sewn
- 3 have been chosen to do and assigned a project number but nothing has been done on them other than some fabric selection
Don't forget to head over to Patchwork Times to see what else is happening among our quilt/blog friends.
Monday, January 11, 2016
Design Wall Monday, 11 January 2016
Seems I've been, and still am, a bit disjointed lately. I'm scattered, here, there, bouncing off the walls if you will, and totally unsettled with my projects.
First I pulled out my Black Tie Party bow ties, and showed them a few days ago.
Before that, I had cut and prepared the pieces for Allietare (mystery quilt that's no longer a mystery). My friend gets back around the 24th so we can plan on getting started on it then.
You all know from my last two posts about my quilt room issues - perhaps more than you ever wanted to know. I at least decided to start somewhere so pulled out a small bin from hiding underneath the small desk/cutting table hidey-hole. It contained some fabric pieces that needed to be stripped and put away. Somewhere along the process of doing that, I came across my Scrap O' Nine Tales. I started that as my Let's Book It project two years ago in January 2014 @ Vrooman's Quilts .
I reviewed where I left off, and planned where I wanted to go with the project, and determined I still needed to cut a whole lot of scrap fabric.
Well, I'd been cutting scraps anyway, and this fit perfectly into that plan, so that's what I'm working on today.
Head on over to Patchwork Times to see what other projects are out there.
First I pulled out my Black Tie Party bow ties, and showed them a few days ago.
 |
| I rearranged grouping identical blocks, and sets yet to becom blocks. Now I know what I have. |
You all know from my last two posts about my quilt room issues - perhaps more than you ever wanted to know. I at least decided to start somewhere so pulled out a small bin from hiding underneath the small desk/cutting table hidey-hole. It contained some fabric pieces that needed to be stripped and put away. Somewhere along the process of doing that, I came across my Scrap O' Nine Tales. I started that as my Let's Book It project two years ago in January 2014 @ Vrooman's Quilts .
 |
| 9-Patch blocks, finished size will measure 2 1/4" square. |
 |
| 6 1/4" strip will give 5 squares, 5" strips will 4 squares for the 9-P blocks. The strips are cut at 1 1/4". |
Head on over to Patchwork Times to see what other projects are out there.
Sunday, January 10, 2016
That Quilt Room
Here's an update, and a continuation from yesterday's post. In placing some of the bins on that rack, it appears there just might be room to shorten the rods by the amount I need, and the rods are inserted into the end-boards using screws so they'll be easy(?) to remove and shorten. So problem #1 may be solved (in the near future) which opens up that the rack-bins may not hold ALL of the fabric in the closet bins - what to do? Make more quilts!!
The bigger problem: I fussed, and I fiddled, I measured and cut quad-squares to fit my measurements, but cannot find a better layout given the size of the room, the furnishings I have and still have ease of flow into the room and to the stash closet, and to sit in my chair.
 This is my current layout, designed to scale. Each square equals 6". It works, but it's tight to move around in.
I've thought about cutting the cutting table down to 48". If I were to get the insert for the sewing cabinet, I could store the portable sewing table opening up a little bit of space. It would cost a couple hundred to get the insert. Not presently in the budget.
Off to the side I show what would have been the projected cabinets for that east wall. With those in place, much of the clutter-stuff would be behind cupboard doors. The hutch shelf would be gone, but I'm not sure at this point how I could arrange to incorporate the cabinets. My thoughts were to have the cutting table under the window possibly still utilizing the file cabinets but I'd want spacers to bring to a height I could stand at. The small desk would also be gone. The sewing cabinet would parallel the cutting table, but then I'd be back to only 24" chair space between the two. I could only gain 4" if I narrowed the depth of the cutting table to fit the large mat. If I put wheels additional wheels on the center section (it's 3 sections screwed together) of the sewing cabinet, the right end could be placed elsewhere - I only use the drawer with the cupboard area just for some stored stuff.
The reality is, Ineed would prefer a bigger space. Maybe I could trade this room for the master bedroom...it sits unused all day and has twice the space easily, hmmm...it has very poor lighting though and would need a complete make-over. I doubt that will ever happen. I'll just have to figure out how to make this room look and work better for now. I'll keep working on it. I shouldn't complain, I know many of you out there, have no dedicated ROOM for your quilting, and are happy with a corner of your dining, living, sleeping quarters. Pray for MY contentment :/
The bigger problem: I fussed, and I fiddled, I measured and cut quad-squares to fit my measurements, but cannot find a better layout given the size of the room, the furnishings I have and still have ease of flow into the room and to the stash closet, and to sit in my chair.

- The ironing board is shown there on the left. It's always up and that wall is my design wall.
- In that lower left corner is 2-dr filing cabinet upon which sits my TV.
- Next to the filing cabinet is a plant stand that has a box on it for the kitties to keep me company. The stand actually belongs in the guest room and I'd like it to go back eventually.
- To the right of the plant stand, is my sewing cabinet.
I did not have it until after my quilt room was finished, and I got it free so could not turn it down. It has a well for the sewing machine but I do not have an insert to fit my machine so I keep the solid insert in place and keep a cutting mat over that. That is my main, multi-functional work surface for all things done in this room. In this position, I can also easily view the TV and the design wall. When I face the cabinet in my chair, I can easily spin to my left where...
How it would look with the machine. This is how the cabinet is positioned in the room. - I have my portable Sew-Ezi sewing table set up.
My machine is almost always set up in it. The problem with this arrangement is I cannot access any of the drawers on the sewing table unless I slide the sewing table to my left, or if you're getting your bearings from the photo, the far right corner, which is...
Taken before the sewing cabinet came home - things were situated differently then. - The retained 30" x 60" formica top from my old desk. It sits atop two more 2-dr filing cabinets of which one is pretty much inaccessible because of the legs of the sewing table. This serves as my large cutting table with large mat. There is just enough clearance for the sewing table to slide about 8" underneath it when I do get into the drawers of the sewing cabinet. Atop this also are a) another larger box for the kitties - they often are both in here but don't lay together, b) my pressing mat which is on the cutting mat, c) a lamp, d) an 8-tier file organizer (more is done in this room than quilting), e) our printer, along with an assortment of whatever may not have been put away or is being worked on. All of these items abut the south wall which is the only wall with a window which measures 71" wide.
- Turning the corner, proceeding onto the east wall, with the longer side of the cutting table taking up most of the space, there is a 'free-floating' student desk on wheels, my perfect sit at height but not used for anything other than storage at present.
Supplies sit on it, and it's small shelves hold tablets and office tools. I have it sitting sideways as that hutch shelf unit (spoken of yesterday) is against the wall along the remaining length. On my diagram, the shelf is only sketched in. When it's gone, the small desk can go against that wall, but that still won't give me a lot more room. I'm showing...
Little desk still at the neighbor's garage sale before coming home with me. - The two, wheeled carts in the closet where they belong.
- Between the two doors (entry and closet) is the perfect width space for the bookcase.

My helper when I first put the books back on the shelves.


I've thought about cutting the cutting table down to 48". If I were to get the insert for the sewing cabinet, I could store the portable sewing table opening up a little bit of space. It would cost a couple hundred to get the insert. Not presently in the budget.
Off to the side I show what would have been the projected cabinets for that east wall. With those in place, much of the clutter-stuff would be behind cupboard doors. The hutch shelf would be gone, but I'm not sure at this point how I could arrange to incorporate the cabinets. My thoughts were to have the cutting table under the window possibly still utilizing the file cabinets but I'd want spacers to bring to a height I could stand at. The small desk would also be gone. The sewing cabinet would parallel the cutting table, but then I'd be back to only 24" chair space between the two. I could only gain 4" if I narrowed the depth of the cutting table to fit the large mat. If I put wheels additional wheels on the center section (it's 3 sections screwed together) of the sewing cabinet, the right end could be placed elsewhere - I only use the drawer with the cupboard area just for some stored stuff.
The reality is, I
Saturday, January 9, 2016
Itching to Change
Why do I get the itch to change things around when it's probably the least convenient time to do so? You may recall that Marty ever-so-graciously worked hard to create my craft room in summer 2014. That was only the construction side of things, and it's all well and good; I'm not wanting to make any changes to that...unless there was a way to add a half inch to the depth of my stash closet. There isn't unless we remove the wallboard on the inner short wall - it's tempting! I would not relish moving my entire stash out though in order to avoid the guaranteed dust from such a project. Here's what prompts this thinking:
 Just inside, to the right of the closet door is this space. It measures 33.75" from the wall to the edge of the shelf boards. It's perfect for my bins that hold fabric I don't put on the shelves, pieces not yardage. Whenever I search for fabric to fulfill a scrap quilt need I have to wrestle these out one at a time and wrestle them back in when I'm done. It's inconvenient, and it's hard on my aging back. I need a better solution.
With Marty once again unemployed, the solution needs to be inexpensive. I thought, hmmm, there are two toy bin racks. One I've been using out in the hallway under the mirror as a quilt rack, while utilizing the bins for projects and my FQs. The other is still taking up space in Nick's room and I think he'd like it gone.
I thought this might be a good solution if it could fit in that space. So I measured it. Wouldn't you know, it measures 34.25" in width...a HALF INCH too wide! Oh sad faced me :( . I thought, well, maybe we (meaning Marty) could remove one end and shorten the dowels, but instantly, I realized the bins would no longer fit if that were done.
 Still standing in the closet contemplating what could be done, I thought maybe I could move the two lowest shelves to abut the wall on the other end and proceeded to measure that space which would allow the equal amount of open area on the other end.
 Only a little over 9". Could be tight. Not to mention I wouldn't be able to stack those small bins there any more. I usually have four stacked and they fit perfectly though the lid will extend over the end of the shelf.
 Unfortunately, it was clear that this would not work either. The rack is inches deeper than that space would provide and additional space is required behind it to allow the bins to sit in correctly. I suppose it's possible to notch the boards but I'd rather not. But I might consider it. Back to the drawing board. Meanwhile,
 I know, this looks a total mess, and it IS even by my standards - please ignore the dust as well. Getting back to this room as a whole, my original intent as I planned it and before Marty did his work, was to have cabinetry along the entire wall where you see the shelf unit in the background. About that time was Marty's first lay off, so cabinetry became nothing more than a past thought, and since we had this shelf 'thing', I used it.
Some of our household furnishings have been scavenged from the neighborhood and back when I first became a stay-at-home-mom, this was one of those 'freebies'. It's actually the hutch that would be atop a dining room buffet dating back to the 60s or 70s. Over the years, it was just convenient to use it here and there and this is where it ended up. I was recently reconsidering the cabinets but under current situation, it's a no-go until there's income. However, I'm really tired of this cluttered mess. The two drawered carts shown with stuff stacked all over them belong in the closet. They're wheeled so that was their original place, but every time I needed to get to the bins in the first picture, I'd have to wheel them out. The cart drawers are full and shallow, so can't be a substitute for the large bins.
I'm considering rearranging the rest of the furniture in this 9.5' x 10' space too, hoping to make it more functional and easier to navigate. With a space this small, layout is very important, and I'm thinking it needs a better arrangement. I'll be getting out my graph paper, tape measure, scissors and removable tape and this will keep me occupied for the rest of the day.

With Marty once again unemployed, the solution needs to be inexpensive. I thought, hmmm, there are two toy bin racks. One I've been using out in the hallway under the mirror as a quilt rack, while utilizing the bins for projects and my FQs. The other is still taking up space in Nick's room and I think he'd like it gone.
 |
| Bin added for visual effect. |


Some of our household furnishings have been scavenged from the neighborhood and back when I first became a stay-at-home-mom, this was one of those 'freebies'. It's actually the hutch that would be atop a dining room buffet dating back to the 60s or 70s. Over the years, it was just convenient to use it here and there and this is where it ended up. I was recently reconsidering the cabinets but under current situation, it's a no-go until there's income. However, I'm really tired of this cluttered mess. The two drawered carts shown with stuff stacked all over them belong in the closet. They're wheeled so that was their original place, but every time I needed to get to the bins in the first picture, I'd have to wheel them out. The cart drawers are full and shallow, so can't be a substitute for the large bins.
I'm considering rearranging the rest of the furniture in this 9.5' x 10' space too, hoping to make it more functional and easier to navigate. With a space this small, layout is very important, and I'm thinking it needs a better arrangement. I'll be getting out my graph paper, tape measure, scissors and removable tape and this will keep me occupied for the rest of the day.
Thursday, January 7, 2016
It's A Black Tie Party
Maybe not a real party, but that's what I'm calling this quilt "Black Tie Party".
After discovering Bonnie Hunter's Quiltville a few years back, I was browsing through her site, reading and learning about what she calls Leaders and Enders and discovered her Cheddar Bow Tie quilt, which was actually a L&E project for 2011. I thought that would be a really fun way to use up some of my scraps, but I didn't want cheddar as my background. I auditioned several samples for the background by just laying out the cut bow tie squares on the yardage.
 First was this one with tiny black dots on white. Ok, but only so-so. I was looking for something different.
 Next, I tried a blue that had some glitter to it. No, that still isn't working for me. Also, the blue bow ties just didn't contrast enough.
 After that was a white-on-cream floral tonal. A bit too blah for me.
 The same could be said for the white-on-white of scattered tiny dots - reminded me of when snow first starts to fall, but it didn't do much for me as the background.
 This was the winner. Simple, plain, solid black. Exquisite. Classy. At that moment, the name "Black Tie Party" came to me as well. This was in May of 2013. I loved how the brighter fabrics really popped off the black, and even the duller fabrics still showed up nicely.
 I haven't counted how many of these 3.5" blocks (to finish at 3") I've made. 364 sets are what I had available, but I don't recall if I had a specific width x length in mind and didn't write it down if I did, or if that was just the amount I'd randomly cut because that's all the black I had. It was time to see how they looked side-by-side. First, I started matching up sets of four and laid them out as shown above. Um, ok, but maybe there's something I like better. There were also a whole lot more that didn't have four pieces to make a set, so if I use this lay-out, it would only be for a portion of the quilt.
 Then I took all those others that were completed, and laid them out like this. These are all different, and where there's a block that's the same, I pinned them together showing only one block; some have two, some three, and most just have one. I really like how this looks on the design wall. The picture does not do it justice, but I know there are dozens of lay-outs I could go with and I'll play around a little more before making a final decision. It's a whole lot nicer looking at these on the design wall than having just the bare white styro-board. Where IS that piece of flannel I bought last summer?
 There are still a few more to add as these units yet require some stitching. This is the last for which I had enough of the same black available.
 There also are these tie units cut. I'm not sure I want to risk throwing a different black fabric into the mix though. Blacks can be tricky, so I will probably hold off on these for a second quilt, and who knows, maybe I'll go with one of my first choices as background, or cheddar. Hot red sounds seductive so maybe it has possibilities.
After discovering Bonnie Hunter's Quiltville a few years back, I was browsing through her site, reading and learning about what she calls Leaders and Enders and discovered her Cheddar Bow Tie quilt, which was actually a L&E project for 2011. I thought that would be a really fun way to use up some of my scraps, but I didn't want cheddar as my background. I auditioned several samples for the background by just laying out the cut bow tie squares on the yardage.


Tuesday, January 5, 2016
A Quilt Store Reopening
For those in the Yamhill, OR area, The Quilted Hill is re-opening tomorrow at 10:00 a.m.!
7601 NE Blackburn Rd.
Yamhill, Oregon
503-662-4052
This was a favorite find on my trips north, but it had closed a year or two ago. It's in a rural area, but is a nice place to visit.
I wish I could be there.
****Update: they have posted that their credit card machine has not yet arrived, so if anyone goes, be prepared with cash and/or check.
****Update: they have posted that their credit card machine has not yet arrived, so if anyone goes, be prepared with cash and/or check.
Monday, January 4, 2016
Design Wall Monday: 04 Jan 2016
Once again, I'll be killing two birds with one stone by linking at both Patchwork Times for Design Wall Monday, and at Quiltville for the Mystery Quilt link-up. I've been seeing a whole lot of gorgeous Allietare interpretations out there, along with some other projects being worked on. Go, check them out for yourself.
On my 'wall' (table) are the units for the final clue of Allietare, and I chose the fabrics I plan to use for the outer border (the black) and for the binding (the red), so here are the photos. Still no sewing of course, since I'm waiting for my friend to return in a few weeks. We'll have lots of fun then, and in the mean time, I have plenty of other projects to work on towards finishing and hopefully, those will be with next week's link-up.
On my 'wall' (table) are the units for the final clue of Allietare, and I chose the fabrics I plan to use for the outer border (the black) and for the binding (the red), so here are the photos. Still no sewing of course, since I'm waiting for my friend to return in a few weeks. We'll have lots of fun then, and in the mean time, I have plenty of other projects to work on towards finishing and hopefully, those will be with next week's link-up.
 | |
| unit pieces |
 |
| outer border fabric, binding fabric |
Sunday, January 3, 2016
03 January 2016 Stash Report
The year is young (wish I was - hehe) so there isn't much to report. All zeroes so far.
Used This Week: 0 yards
Used Year to Date: 0 yards
Added This Week: 0 yards
Added Year to Date: 0 yards
Net for 2016: 0 yards
Linking at Patchwork Times.
Have you been on a purchasing or sewing frenzy yet this year?
Used This Week: 0 yards
Used Year to Date: 0 yards
Added This Week: 0 yards
Added Year to Date: 0 yards
Net for 2016: 0 yards
Linking at Patchwork Times.
Have you been on a purchasing or sewing frenzy yet this year?
Subscribe to:
Posts (Atom)